This article shows you how to add resources in YakTrak.
The Resources page enables you to add resources such as documents, videos, text, photos and sound bytes. Anything an administrator adds here will be accessed by every user unless permissions are disabled.
The content within the resources section is managed by an internal administrator. Content can be added and removed if you have the relevant permissions. If you are an administrator and don't have access to add or remove Resources, reach out to YakTrak Support.
The first step is to add a folder if it does not already exist. You can add folders or sub folders with in a folder.
How can i add a resource?
- From the main menu, select "Resources" and then click the "Create" button. You will see three options appear in the dropdown menu.

-
- Upload Resource: This option enables you to add various types of files, including Word documents, videos, and audio clips.
- Create Link: This option enables you to add a hyperlink to an external site, such as your organisation's intranet or a Learning Management System (LMS).
-
- Create Folder: This option enables you to add a folder.
Upload Resource
- Select "Resources" from the main menu, Click "Create" followed by "Upload Resources"
- Click on the grey box to begin the upload process for your resource, then proceed by clicking "Next."
- Provide a Title and Description to display in the listing, then click "Next" to proceed.
- In the "Visibility" section, toggle the switch to choose between "Visible to all members" or "Visible to select members only."
- If you select "Visible to some members," a list of roles will be displayed for you to choose from.

- Here, you can specify which users or roles should have access to your folder.
- Click "Save"
Create Link
- Select "Resources" from the main menu, Click "Create" followed by "Create Link"
- In the "Details" section, enter a Title and a Description that will be displayed in the resource listing, then click "Next" to continue.
- In the "Visibility" section, adjust the toggle to select either "Visible to all members" for general access or "Visible to select members only" to restrict visibility to specific users or roles.
Create folder
- From the main menu, click on "Resources" to access the corresponding screen.

- Select the 'Create' button in the upper right corner, then choose 'Create Folder' from the dropdown menu. This will open a pop-up window where you can enter additional details.

- Enter a Title and Description that will be displayed in the resource listing, then click "Next" to proceed.
- Include a "Header" – This will be displayed at the top of the folder page, providing a clear indication of its contents.
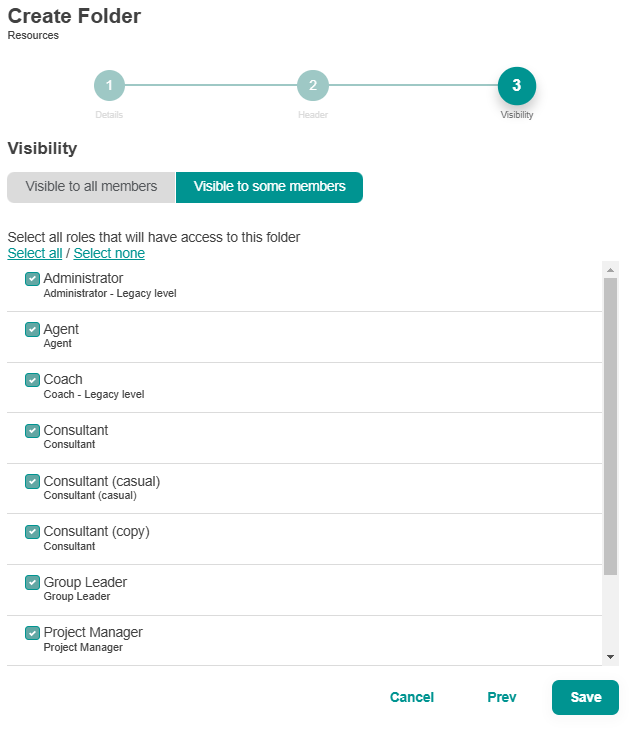
- In the "Visibility" section, adjust the toggle to select either "Visible to all members" for unrestricted access or "Visible to specific members only" to limit visibility to designated users or roles.
- When you select "Visible to some members," a list of user roles will be displayed for you to choose from.
